Understanding of differential micrometer head
Understanding of differential micrometer head
The micrometer head is an adjustment and positioning device, the minimum can be adjusted to microns, also known as the micrometer head, the micrometer head, and the centimeter card head; Composition of spinners.
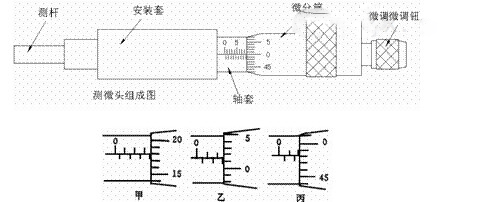
Differential head reading and use:
The installation sleeve of the micrometer head is convenient for fixed installation on the bracket seat. The main ruler on the shaft sleeve has two rows of scale lines. .5mm/grid); 50 equal divisions (0.01mm/grid) are engraved on the peripheral surface of the front part of the micrometer cylinder.
When the microtube or fine-tuning knob is rotated by hand, the measuring rod advances and retreats along the axis. Every time the micrometer tube rotates 1 division, the measuring rod moves along the axial direction with a small displacement of 0.01 mm, which is also called the division value of the micrometer head.
The reading method of the micrometer head is to read the scale value exposed on the main scale of the shaft sleeve first, pay attention to the half-millimeter engraved line; then read the value on the microtube that is aligned with the horizontal line of the main scale, and you can estimate 1/10 division, as shown in the figure : The reading of A is 3.678mm, not 3.178mm; when the front end of the edge of the differential cylinder coincides with a certain line on the main scale, it should be checked whether the indication value of the differential cylinder crosses zero, as shown in Figure B, read 2 .514mm; if it does not cross zero in Figure C, it should not be read as 2mm, but should be read as 1.980mm.
Use of the micrometer head: The micrometer head is a tool used to generate displacement and indicate the displacement in the experiment. Generally, before using the micrometer head, first turn the micrometer cylinder to 10mm (in order to reserve the margin for the forward and backward displacement of the measuring rod axis), and then install the horizontal line of the main ruler on the micrometer head sleeve facing itself to the special bracket. On the seat, move the mounting sleeve of the micrometer head (the micrometer head moves as a whole) to connect the measuring rod with the measured body and make the measured body in a proper position (depending on the specific experiment) and then tighten the fastening screws on the bracket seat . When the micrometer cylinder of the micrometer head is rotated, the object to be measured will be displaced along with the measuring rod.
Application fields of differential head: 1. Production and testing equipment of DVD, MD, CD-related optical disc reading lens and writable optical head. Mainly arc positioning platform. 2. Prism positioning and loading of LCD projectors. 3. Optical fiber positioning, optical communication system products and testing equipment. 4. Liquid crystal production and testing equipment. 5. Semiconductor related production equipment and inspection and evaluation equipment. 6. Used in places where the adjustable parts on machine tools, fixtures, special measuring tools, tools and other equipment need thousandth precision
Classification of differential heads:
Optional flat and spherical probes
Optional straight or rotary arbor Optional with/without lock nut Optional with/without ratchet lock (ratchet lock maintains constant force measurement)

